Thursday, November 30, 2017
Let Life Surprise You
Hi everyone, Steph Ackerman here today using lots of products from the Rubber Buggy Store. If you haven't visited the store recently, you are missing out on a lot of fun products.


I cut the phrase from the Rose Quartz collection, adding it to the corner with foam adhesives.

I wonder what she is thinking!!!
Thank you for visiting

Using Scor-Pal, I created a card from brown cardstock. The woodgrain layer is from the Prima Marketing Rose Quartz 6" x 6" paper pad. I matted several of the map papers from this collection with brown cardstock and adhered them together, wrapping them with Bakers Twine before adding the panel to the card with foam adhesives.

Using assorted Copic Markers, I colored the Stamping Bella stamp - Molly Makes a Detour. I wanted her to be vibrant as she sits upon her suitcases contemplating what is ahead.


I wonder what she is thinking!!!
Thank you for visiting
Wednesday, November 29, 2017
Bullet Journaling Made Easy with Netra
I hope this post finds you all well and enjoying life !
I have been so excited for each day to start lately.
It may be the cooler weather or my planners. LOL
Today I am sharing another Bullet Journal layout. I like the idea
of a bullet journal but I don't truly need one. One thing, I know we
all need is a cleaning to do list. So, I have set up one for this week
in a bullet journal fashion.
I used
Markers ( you can use anything to add color)
Black pens


 |
| I traced my stencils with a black pen and then colored them in. They look hand done this way. |
I hope you like this simple project. Have a wonderful day.
Thank you for visiting
Tuesday, November 28, 2017
Birthday Fishes

Hi it's Jennifer here with a card I have created using a
sketch keep your eyes peeled as to where this sketch might
pop up in the next couple of days 😉
I have created 1 large piece of coloured paper by inking it
with Oxide Inks Fossilized Amber, Broken China and Peeled Paint.
So you don't always need coloured papers you can create your own.
I have flick tiny droplets of water on it then mopped it up.
I have then Stamped in Lawn Fawn Jet Black Ink
2 fish from this really Awesome Stamp Set
Memory Box Fish Tales then coloured them using Copics.
This is a definite must have Stamp Set for Males you can do so much
with it. I have then used Lawn Fawn Small Stitched Circles
to cut out the circles and then little black port holes.
In the bottom port hole I cut a fish in half so he looks lots
longer than he is going from one hole to the next.
I stamped the Sentiment in White Embossing Powder
to make it stand out and cut a couple of strips of the coloured
paper matted it of black cardstock to help my colours pop.
Hope you enjoyed this.
Enjoy your Week
Jennifer
Monday, November 27, 2017
Cards made using Graphic 45 Winter Wonderland

At The Rubber Buggy I have been creating using Graphic 45 Winter Wonderland. Making cards is amazing using this collection. Such a great mix of prints, borders and fabulous accents to mix and match.
Supply List:
The Rubber Buggy Products
Paper: Graphic 45 Winter Wonderland
Glue: Beacon 3-in-1
Ink: Ranger Dye Ink Pad
Die: tutti 361 merry christmas
Other: twine, cardstock

To make this card I started with a red background mat. I pulled paper and hand cut apart some pieces... a call card size image for main piece and a strip for a border.

I started laying our the proposed placement and then glued down the main pieces.
I like to see what it looks like before gluing it down. I also like to add the extra mats where needed and if I am adding either brads or wrapped twine I do that before gluing down to the main card base.

Notice the wrapped twine in this photo.

I got this new tutti die and decided to die cut it and put it in the upper part of the inside of the card.
***********************

Up next using the same collection I created this card. I estimated the placement of the print on the paper so it would be the central section of my card. I cut the small tag and added tied twine, I die cut the sentiment and then added some brads. Add a mat and this easy card is done.


Inside this card I stamped a verse.


Be sure to visit the STORE where you will find this collection and so many more. Thanks for stopping by and see you again soon.

Saturday, November 25, 2017
Christmas Bunny

Nancy Hill for The Rubber Buggy Design Team. I am excited to share my Christmas card made with the wonderful products at The Rubber Buggy Design Store. I made a small tutorial on how I made the 3D frame. This technique can also be used to made shadow boxes. I tried other techniques of using 3D foam behind each rectangle frame but the 3D foam just was too large and difficult to cut out for the 1/2" frame border.
Tape two Spellbinder Nestabilities or Sue Wilson rectangle frames together as shown below. If you want a wider frame border, use the size larger and tape the two dies together.


I applied blue ink inside and outside the frame with a sponge. As you can see below, the inside and outside frame color matches the top patterned paper frame.

I like using the Scor-Pal Tape 1" wide to tape the picture behind the green Heartfelt Creations patterned paper. I use the same 1" Scor-Pal Tape to tape this to my folded cardstock.

I colored the Wild Rose Studio Christmas Bunny stamp with Copic Markers and cut this out with the plain oval die in the Heartfelt Creations Eyelet Oval die set. I cut out the Heartfelt Creations Eyelet Oval decorative die with white cardstock and glued the bunny image on top. I used Scrapbook 3D foam adhesive tape to glue the decorative die to inside of the frame.

I applied drops of Aleene Fast Grab glue around the Christmas Bunny and sprinkled on Stampendous Chunk White Deep Impression Embossing Enamel. After shaking off the embossing enamel that wasn't stuck to the glue, I used an embossing gun to the embossing enamel. I love this embossing enamel when I want to make the snow appear to be 3D.

 |
| Poppy Stamp Merry Christmas Banner Heartfelt Creations Eyelet Oval Die Wild Rose Studio Christmas Bunny Heartfelt Creations Celebrate The Seasons |
I can't wait to see the possibilities that you will create making a wreath. You can purchase these dies and supplies from The Rubber Buggy on-line store.
Enjoy and Happy Crafting!
 |
| Nancy Hill The Rubber Buggy Design Team |
Thursday, November 23, 2017
Happy Thanksgiving with Prima Marketing
Hi everyone, Steph Ackerman on the blog today wishing you a Happy Thanksgiving. Hope you have a wonderful day (and save a little time for some crafting!) Check out the Rubber Buggy store for some amazing products.

I've used the Prima Marketing Autumn Moon 6" x 6" paper pad. This collection is amazing and perfect for your Fall creations.

Using my Scor-Pal, I created a card from Bazzill Circus Peanuts cardstock. Several sheets of papers from the Amber Moon collection were matted with the same cardstock and added to the card.

I wrapped the top panel with May Arts sheer ribbon before adhering it to the card. Then I die cut assorted pattern papers and Circus Peanuts cardstock using Spellbinders dies, adding them to the card with foam adhesives.

Using part of the pattern paper that says Hello Autumn, I die cut it and matted it to a larger die before adding it to the ribbon.


Thank you for visiting

I've used the Prima Marketing Autumn Moon 6" x 6" paper pad. This collection is amazing and perfect for your Fall creations.

Using my Scor-Pal, I created a card from Bazzill Circus Peanuts cardstock. Several sheets of papers from the Amber Moon collection were matted with the same cardstock and added to the card.

I wrapped the top panel with May Arts sheer ribbon before adhering it to the card. Then I die cut assorted pattern papers and Circus Peanuts cardstock using Spellbinders dies, adding them to the card with foam adhesives.

Using part of the pattern paper that says Hello Autumn, I die cut it and matted it to a larger die before adding it to the ribbon.

For my second card, I used the same pattern paper pack but selected different papers to use.

Using my Scor-Pal I created a card from Bazzill Cardstock and added the woodgrain paper layer. Next, I wrapped it with May Arts ribbon.

I tore the pumpkin layer and matted it with cardstock before adding it to the card with foam adhesives. Finally, I cut apart the one of the papers, matting each with cardstock, and adding to the card with foam adhesives.
Happy Thanksgiving
Thank you for visiting
Tuesday, November 21, 2017
Lawn Fawn Shaker Slider Box Card

It's Jennifer here with a Shaker, Slider Box Card my Sister Challenged
me to it so I gave it a go and really love how it came up.
I used all Lawn Fawn Goodies I will give you a list at the end.

So I have a slider on the front flap and on the back one I have created the
shaker in the snowy mountains. I might have to take a close up for you.
The slider was too long so I did a partial die cut one end then a partial
die cut from the other end it worked beautifully.

I hope you enjoyed this Cute Little Box Card. I will add the instructions
again from the Shaker Box Card I did last year saving you look for them.
This is the list of the goodies I used for this card.

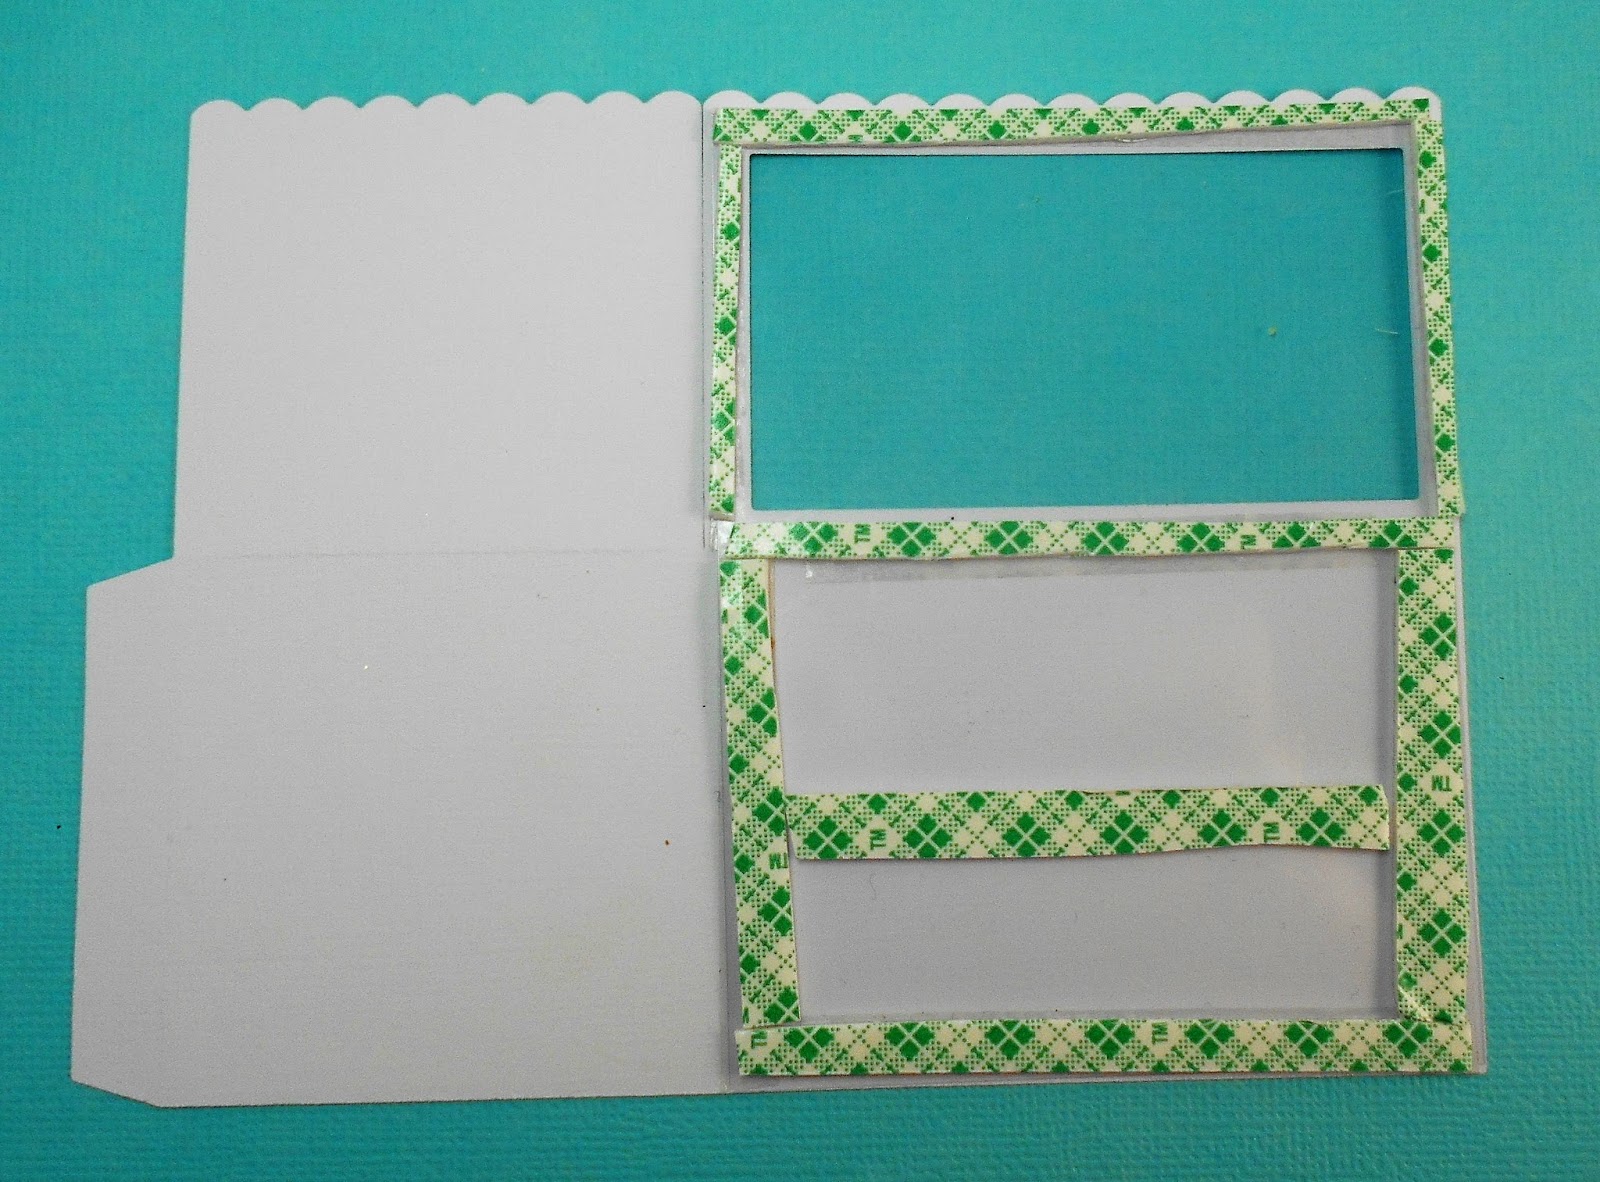
Hi I am here for The Rubber Buggy to show you how to put
together this Awesome and I mean Awesome and a must have
for any cardmaker die the LF Scalloped Box Card.
So all the dies are in the packet and lots of embellishing
ones too that I didn't use. First I cut out two of the Box.
I also used the small layer die to cut out one of the larger
scalloped tops to make a window.

I cut 3 of the inserts.

Then I put accetate over it and my 3M tape
popped a few sequins in it.
I then created the background using 8cm x 10.5 cm

Then placing it over the sequins.
I then added a layer cutting two 5.3cmx 5.3cm and one
5.3cm x 7.9 cm

cutting two 5.3cm x 4.5cm and one 4.5cm x 7.9cm

I then used the layers from the kit this is the bottom of the box
and missed the pic for the top layer. I used
LF Winter Perfectly Plaid.
LF Winter Perfectly Plaid.

So you can see the shaker here and see where I have joined
the two pieces together.

I then taped each end of the inserts I placed them on the smaller
section equally apart.

I taped the joining piece on the end and if you lay them all flat
you fold the bigger section down and they all fit perfectly in the
right spots.

this how it folds for a standard envelope too!

With all its layers on and you can see the shaker.

Then to decorate! I used Christmas as I like to do Christmas
Cards 2 a month so by the time I get to Christmas I have done
most of them. I used the Fabulous LF Cheery Christmas Set.

Love the way it come out. The sentiment is from
LF Big Scripty Words Winter.
LF Big Scripty Words Winter.

All these products and more are avaliable at the
The Rubber Buggy Shop and don't forget to visit us on Facebook look for the Videos
down the side too, Instragram and the Rubber Buggy Design Team Blog
where there's a post nearly everyday from one of the team.
Happy Crafting
Happy Crafting
Jennifer
Subscribe to:
Posts
(Atom)


