Saturday, November 28, 2015
Santa and Rudolph Shaker
Hi Everyone. Dawn here on this fabulous Saturday with my post for The Rubber Buggy, to show you some more inspiration using some wonderful stamps and products from the Store. Today I used Wild Rose Studio stamp set called "Santa and Rudolph".


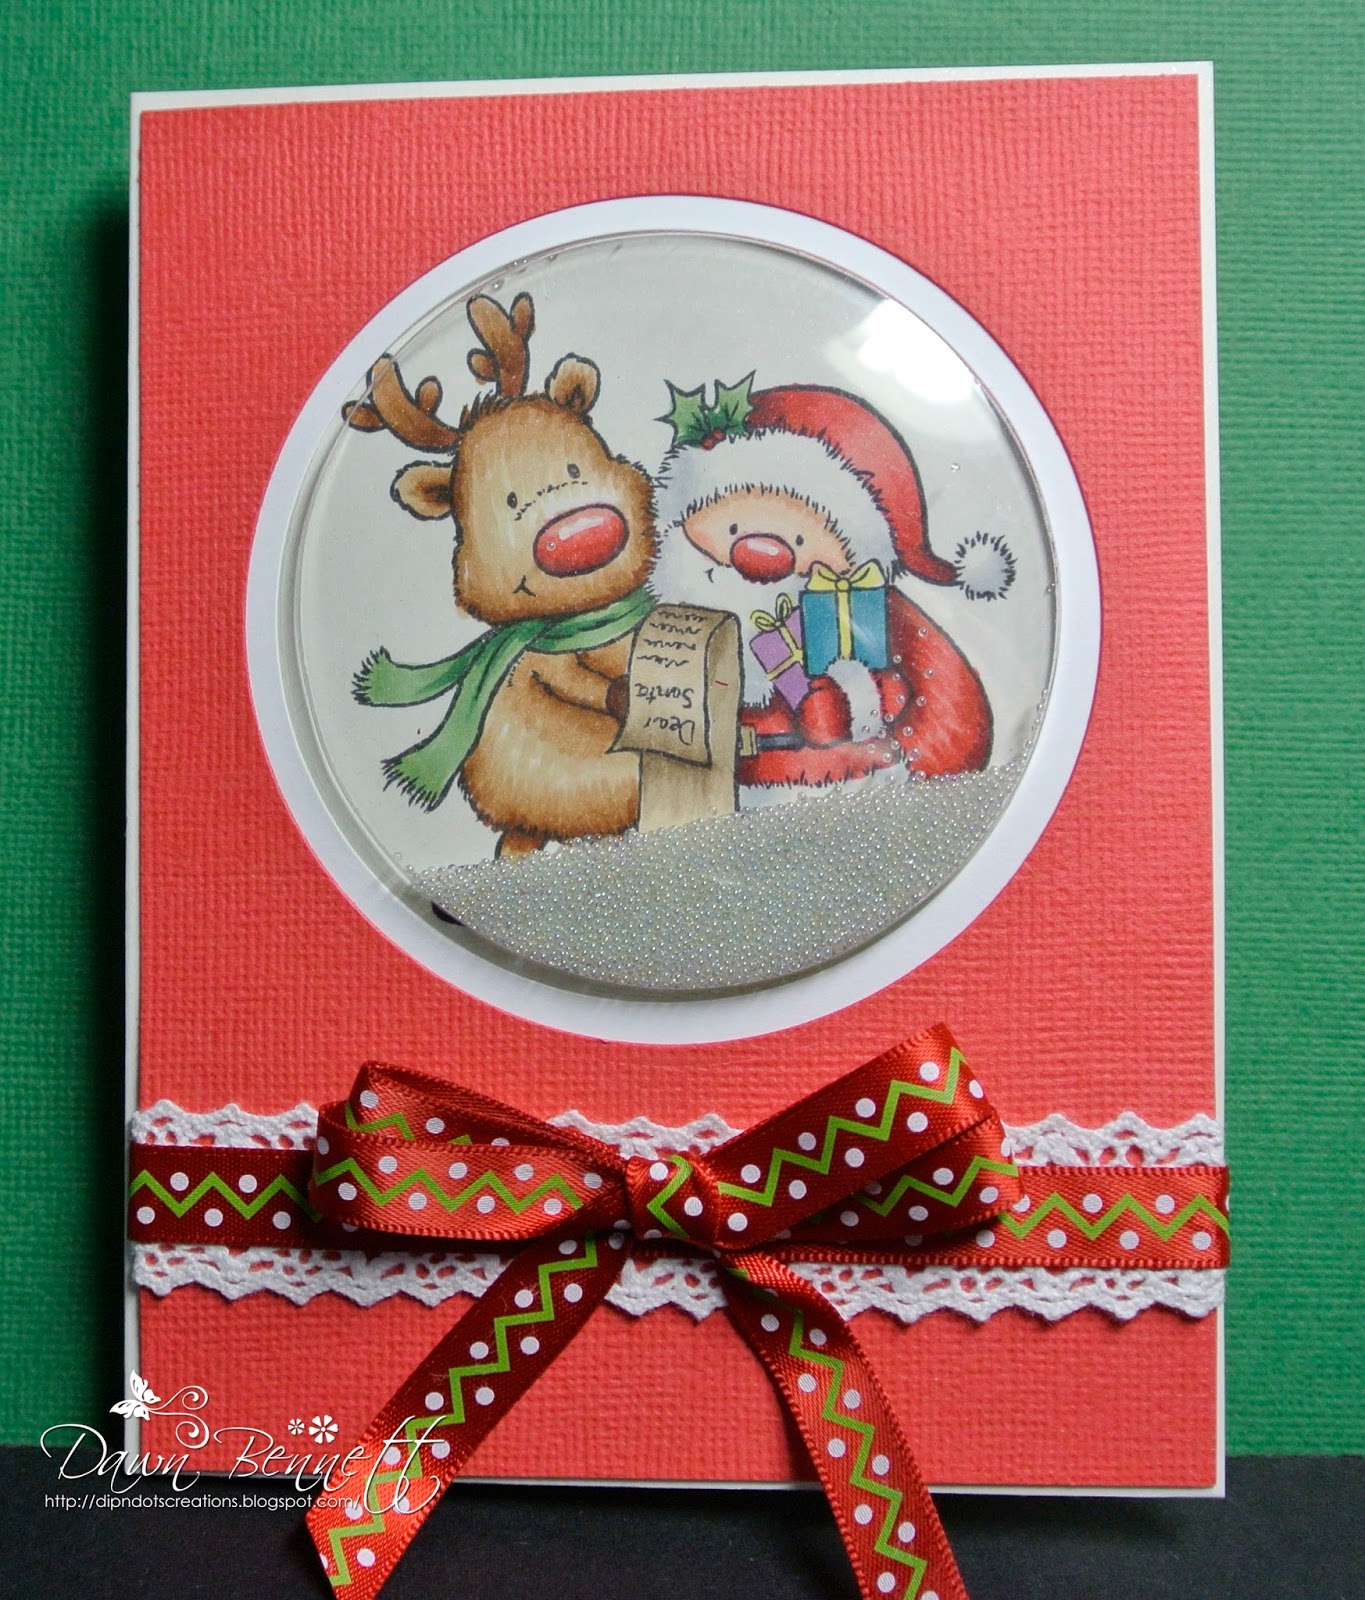
I made a shaker card today.
Copics used:
Skin E11, E00, E000, R20
Reds - R59, R27, R35, R32
greens - G28, G24, G21
Black - C7, C5, C3
Browns - E39, E37, E35, E33, E31, E29, E27, E25
E44, E43, E41
Happy Stamping!!!!!

Friday, November 27, 2015
Love Card with a cute Squirrels
Hi everyone!!
Noe here as every Friday, but not any Friday... Today is the Black Friday!! Have you seen the offers that Kellie has made in the Store?? Don´t miss it!!


I hope you like this card!! I leave here the Black Friday offer!

 Thank you for visiting
Noe here as every Friday, but not any Friday... Today is the Black Friday!! Have you seen the offers that Kellie has made in the Store?? Don´t miss it!!
Today I´m coming with a new card, but not a Christmas Card, today I left them a little aside, I'm romantic and I love animals so this is the card that has come at my mind!

These squirrels are so cute and the set of stamps that come in are really simpathetic!!
Products used:
- Cover Squirrel - Poppystamps.
- Border Grass die... something like this.
- Ranger Archival Jet Black.
- Ranger Achival Vermillion
- Stamping Supplies.
- Spectrum Noir Markers.
- Ultra Smooth Premiun White Cardstock for Alcohol markers.
- Distress Inks pads to make background (Peeled Paint and Peacock Feathers).

I hope you like this card!! I leave here the Black Friday offer!

Wednesday, November 25, 2015
DIY Stickers with Netra
Happy Wednesday to you all !!
Today I am sharing a easy tutorial for DIY Stickers
using Scor-Tape double sided adhesive sheets and Gorjuss Girls Stamps.

1. First take the brown backing off the sheet.
Then apply the sheet to a piece of white paper.
I used

2. Now, stamp your image in Memento Ink.
I used

3. Color your image if you'd like.
Cut out the image.
I used


4. Now you can peel and stick your stickers anywhere.
I added mine to my planner.

Here is a full sheet of stickers. I used some
Distess Inks to stamp some images.
I love them.
I hope you give it a try.
They are so much fun to make and use !!!
Thank you for visiting
and
Happy Thanksgiving to you all !
Tuesday, November 24, 2015
Sweet Christmas shaker cards
Hi everyone!
Pi here with a fun shaker card. Shaker cards are really in demand right now, but this is my first try ever. Many use sequins and The Rubber Buggy has just started to carry some great choices HERE.
However, I haven't really rolled in to that trend either yet. I do own a couple, but for this card I thought I get good use of some really old glass beads from back in the days when I was trying to make some jewellry - as a teenager!!! I didn't get much done, so I have tons and tons of these tiny little beads in several colors, but I don't have the heart to throw them away. And what a good thing, because they went so well as shaker elements! A few really goes a long way here, but they really add some noise plus they are heavy enough to push the rest around.
I also filled my shaker pocket with some faux snow and as that stuff is airlight, the beads really makes it move. I also added some elements from the stamp set I used. I copic colored some peppermints and candy canes and added them to the mix. They are glue together, so they have a front and back, just in case they would turn over - however unlikely...

Products used from The Rubber Buggy store:
Lawn Fawn stamp set Sweet Christmas
Lawn Fawn coordinating die set Sweet Christmas
Lawn Fawn 12x12 collection Let's Bokeh in the snow
Memory box die pinpoint scalloped circles
Circle die
Stamping supplies (Neenah cardstock, bonefolder, doublesided tape)
Thank you for visiting!
Monday, November 23, 2015
Fabulous page using Blue Fern Studios Sanctuary Collection

hi.... Bev here today at The Rubber Buggy I am have a great time creating with Blue Fern Studios Sanctuary Collection. It is soft and elegant and so easy to work with. It allows for layers, texturing, stamping and adding amazing chipboards and lace accents.
Supply List:
The Rubber Buggy Products:
Paper: Blue Fern Studios Sanctuary Collection
Chipboards: Blue Fern Studios Arrow Words, Mini Flourishes
Ink: Tim Holtz ranger, Color Box
Stamp: Blue Fern Studios Halftones
Lace: crochet trim
Other: punch Martha Stewart, Stencil, modeling paste
Scraplift: Danielle from Turtle Soup forum

In the close ups we can view a punched corner with matting to add colour and some stamping You also can see the layer added for colour and just one of the copic coloured chipboards.

Look at the amazing chipboards.. and the choice of words and accents are endless and suit so any themes. I also draw attention to yet another layer for pop of colour and the stamped edges.

More stamping is visible in this close up and the fun knot tied lace accent.
So many options to pick from in The Rubber Buggy store..... be sure to visit the store to custom pick your products.


Thanks for visiting.. do come again soon.

Saturday, November 21, 2015
Swirly Greetings
Hi Everyone. Dawn here on this fabulous Saturday with my post for The Rubber Buggy, to show you some more inspiration using some wonderful stamps and products from the Store. Today I used Wild Rose Studio stamp set called "Swirly Greetings". I made a CAS card, something I don't usually do.


Happy Stamping !!!!

Friday, November 20, 2015
Let it snow Tilda Card
Hi everyone!!
Finally Friday, yeah!! Here Noe with a Christmas card and a style out of my comfort zone! Have you seen all the new products that Kellie added at store?? They´re wonderful!!

What have Magnolia Stamps that we love, right? "A lovely Christmas" new collection is really adorable!
 Products used:


Finally Friday, yeah!! Here Noe with a Christmas card and a style out of my comfort zone! Have you seen all the new products that Kellie added at store?? They´re wonderful!!


- Spectrum Noir Markers
- Ultra Smooth Premiun White Cardstock for alcohol markers.
- Ranger Archival Ink Pad - Jet black.
- Tilda with little snowy Tilda Stamp.
- Lemon Crafts Christmas Greetings 6x6 Paper Pad
- Snowflake kit Doohickey Dies
- Sakura Background Doohickey Die.
- Botanical Stem Memory Box Die.
- Wild Orchid Crafts Heather Stem - White.
- Wild Orchid Crafts Aster Daisy Stem Flowers Deep Ivory
Wild Orchid Crafts Heather Stems - White
Wild Orchid Crafts Heather Stems - White
I hope you like this Card!! Some close ups:

Have a great weekend!
Thank you for visiting
Thursday, November 19, 2015
We Wish You a Merry Christmas
Hi everyone, Steph Ackerman here on this dark and dreary Thursday. It's been another rainy week so it's very dark and dreary. But Christmas isn't too far away now.
I used the Memory Box - We Wish You - die. So delicate and it is such a focal point of my card.


Love how this turned out.
Thank you for visiting.
Steph
I used the Memory Box - We Wish You - die. So delicate and it is such a focal point of my card.

I embossed Red cardstock, then used a glue pen to adhere the phrase in the center portion of the background and used several Graphic 45 Shabby Chic Brads to help hold it in place. After inking the embossed portions of the background with Memento Tuxedo Black Ink, I added it to Green cardstock and then to the card base.

Love how this turned out.
Thank you for visiting.
Steph
Wednesday, November 18, 2015
DIY Post It Note Holder with Netra
Hey everyone. I thought you all would love to see a DIY and easy gift idea.
Its a little holder for post it notes ! Its so simple and cute.

So, I used
Kraft paper because its super thick
I folded so it has a spine to mimic a book. I stamped some
images from the


For the Post it Notes I used some printer paper.
I needed sharp cuts and exact measurements so I used
my new
I stamped more images from the same set in
Distress Ink Pad - EVERGREEN BOUGH
Distress Ink Pad - EVERGREEN BOUGH
and
Each image was stamped 10 times for each stack of notes.
I then sewed them into the booklet.


I hope you like this project. It was so much fun to make.
Thank you for visiting
Tuesday, November 17, 2015
2015 December daily update 5
Hi everyone!
Pi here with the fifth update of my December daily 2015 :D
You can find my first update HERE, my second update HERE, my third update (process video) HERE and my fourth update (process video) HERE.
For more information about the set up, please check HERE.
I'm using pocketed scrapbooking 12x12 design A and my intention is to have a whole page per day.
You can find my inspiration from Nicolejones911's December daily 2014.
I'm sharing a process video here and this time I think I've finally got the camera set up right. But please voice your opinion. If you have any suggestions, I'd love to hear them or if you prefer my earlier videos, where I just talked about the cards after they are done. You can find my December daily 2015 playlist HERE

For the 14th of Dec I made the 4x6 card off record. I used a tag from the Snow day collection and it actually said "To a perfect pair". But I traced the "To" with a white gel pen and stamped "we are" in soot ink by Lawn Fawn using the Milo ABC stamp set. What to you think?


Products used from The Rubber Buggy store:
Lawn Fawn 12x12 collection kit snowy days
Lawn Fawn 12x12 Let's Bokeh in the snow collection
Lawn Fawn 6x6 Let's Bokeh in the snow paper pad
Memory box die open studio stitched circle layers
Ranger embossing powder gold tinsel
MFT die-namic let it snowfall
MFT die-namic decorative doily (no longer available)
(similar die) MFT die-namic dainty doily
Lawn Fawn stamp set snowy days
Lawn Fawn coordinating die set snowy days
Lawn Fawn stamp set Milo's ABC
Ranger archival ink Olive
Lawn Fawn ink Soot
Copic marker
Twine
Stamping supplies (Acrylic block, adhesive, neenah heavy cardstock solar white, etc)
Thank you for visiting!
Monday, November 16, 2015
The Story using 7 Dot Studios Collection
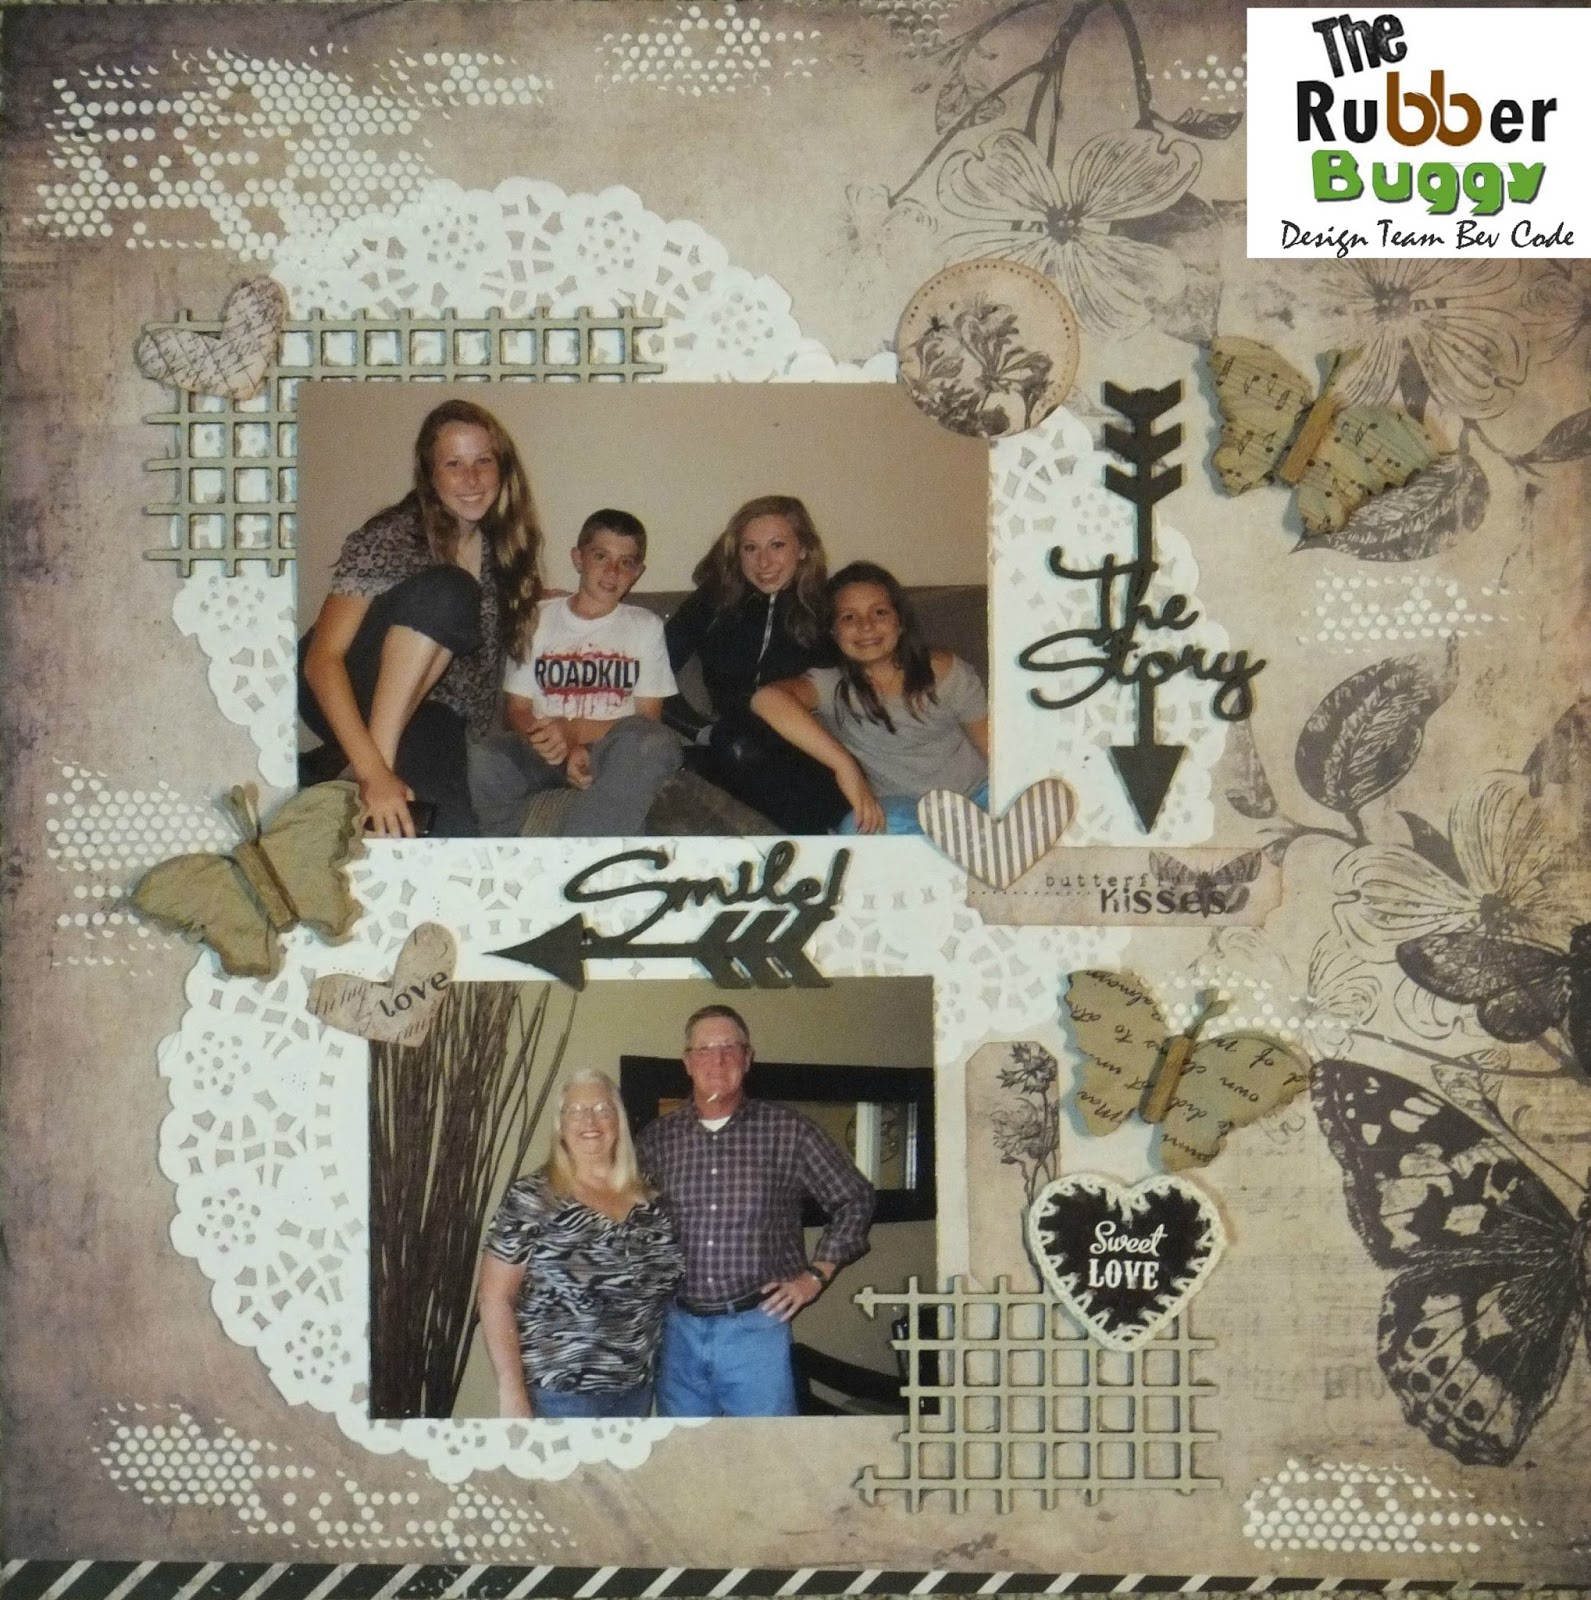
Hi.. Bev here today .....I created "The Story" page I used a Turtle Soup sketch below and also using the great 7 Dot Studios Nature Walk Collection.
Supply List:
The Rubber Buggy Products:
The Rubber Buggy Products:
Accents: 7 Dot Studios Nature Walk Elements 6x12
Doilies: Unique
Chipboard: Blue Fern Studios - Arrow Words
Marker: Tim Holtz distress marker
Other:
Stencil: The Crafters Workshop
Modeling Paste: Liquitex
Other: butterflies and heart accent
Sketch: Turtle Soup (by me)

Chipboard: Blue Fern Studios - Arrow Words
Marker: Tim Holtz distress marker
Other:
Stencil: The Crafters Workshop
Modeling Paste: Liquitex
Other: butterflies and heart accent
Sketch: Turtle Soup (by me)


The clustered section boasts some chipboard, stickers, die cut pieces and a great butterfly.

More chipboard, a fun heart accent and more die cut accents.

These butterflies are a great touch on my page. Also using 3 doilys clustered is a great background layer.

This section shows more of the arrow chipboard words, accent chipboard, some stenciling and great slanted border on the bottom.
All these papers, accents and colours mixed together give a slightly monochromatic look with great layers and textures.
Thanks for visiting.. and come back soon to see what I have to share next ....
Saturday, November 14, 2015
Heidi
Hi Everyone. Dawn here on this fabulous Saturday with my post for The Rubber Buggy, to show you some more inspiration using some wonderful stamps and products from the Store. Today I used Whimsy Stamps Wee Stamp called "Heidi".


I also used Wild Rose Studio Frosted Lace paper pad.

Copics used:
Skin - E11, E00, E000, R20
Hair - E43, E53, E50, E51
clothes - E43, E42, E41, E40, BG09, BG07, BG05
Happy Stamping !!!!
Subscribe to:
Posts
(Atom)


